


In recent years, a big shift has happened in how we think about fashion. More and more people are looking for ways to be kind to our planet while still enjoying style and fashion. This is where the idea of upcycling comes into play. Upcycling means taking old or used items and turning them into something new and stylish. It’s a great way to reduce waste and show off your personal style.
Upcycling is not just about making something new; it’s about giving a second life to items that might otherwise be thrown away. This approach is good for the environment and can also help you save money. Whether it’s turning an old t-shirt into a trendy bag or giving a pair of jeans a new look, upcycling is all about being creative and making fashion choices that are good for the planet.
By choosing upcycled fashion and accessories, you’re not just following a trend. You’re making a statement that you care about the world we live in. Plus, you get to wear unique pieces that won’t be found in any store. In this article, we’ll show you how to get started with upcycling, share some cool project ideas, and discuss why upcycled fashion is becoming so popular. So, let’s get creative and start turning the old into something amazing and new!
Understanding Upcycled Fashion
Upcycled fashion is all about taking items that are no longer in use and turning them into something new and stylish. Unlike recycling, which breaks down products to create something new, upcycling transforms an item without breaking it down. This means that the original materials keep their quality and form, but get a new life as a part of a fresh, fashionable piece.
What is Upcycled Fashion?
- Upcycled fashion is the process of taking old or unused clothing and accessories and turning them into new, wearable items.
- The goal is to reduce waste by reusing materials that might otherwise end up in the trash.
- It’s a creative and sustainable way to update your wardrobe without buying new items.
The Importance of Upcycling
Upcycling is important for several reasons:
Reduces waste: It helps cut down on the amount of clothing and textiles that end up in landfills.
Saves resources: Upcycling uses existing materials, which means fewer new raw materials are needed.
Encourages creativity: It allows people to express their creativity by transforming old items into unique pieces.
By understanding what upcycled fashion is and why it’s important, you can start to see the value in old items that may have been overlooked before. Upcycling is not just a way to be more sustainable; it’s also a fun, creative hobby that can help you develop your unique style.
Getting Started with Upcycling
Starting with upcycling is easier than you might think. You don’t need a lot of fancy tools or materials. Most of what you need can already be found at home or bought at a low cost. Here’s how to begin turning your old items into fashionable pieces.
Basic Materials and Tools Needed
To start upcycling, you will need:
- Scissors: For cutting fabric, denim, or other materials.
- Needle and thread: For sewing by hand.
- Sewing machine (optional): For those who want to sew faster or do more complex projects.
- Fabric glue: For quick fixes or adding decorations without sewing.
- Old clothes and accessories: The main materials you will upcycle.
With just these few tools and materials, you can start creating new pieces of fashion.
Tips for Sourcing Materials
Finding materials for upcycling is part of the fun. Here are some tips:
- Look in your closet: Start with what you already have but don’t wear.
- Visit thrift stores: You can find unique items at low prices.
- Ask friends and family: They might have clothes they’re planning to throw away.
Remember, the goal is to reuse, so try to find materials that can be given a new life.
Preparing Materials for Upcycling
Before you start your project, prepare your materials:
- Wash and dry: Make sure all items are clean.
- Inspect for damage: Look for any tears or stains that might affect your project.
- Plan your design: Think about what you want to create before cutting anything.
Getting started with upcycling is all about being creative and making the most of what you have. You don’t need to be a fashion expert to create something beautiful. With a little bit of imagination and some basic tools, you can transform old items into new treasures that reflect your personal
Transforming Old T-shirts into Trendy Tote Bags
Transforming old t-shirts into trendy tote bags is a fantastic way to upcycle and create something both stylish and practical. Here’s a simple, numbered guide to help you turn those unused t-shirts into new treasures.
Materials Needed:
- Old T-shirt
- Scissors
- Sewing machine or needle and thread
- Ruler or tape measure (optional for precision)
Steps:
- Prepare the T-shirt: Choose a t-shirt. Wash and dry it if necessary to ensure it’s clean before you start.
- Cut off the Sleeves: Use your scissors to cut the sleeves off the t-shirt just outside the seams. This creates the tote bag handles.
- Cut the Neckline: To create a larger opening for your tote bag, cut a deeper neckline. You can decide how wide or deep you want the opening based on what you’ll carry in the tote.
- Determine the Bag’s Depth: Turn the t-shirt inside out. Decide how deep you want the bag to be. A common depth is about 2-3 inches from the bottom hem, but you can adjust based on your preference.
- Sew the Bottom Closed: Sew straight across the bottom of the t-shirt. If you’re using a sewing machine, a simple straight stitch will do. If you’re hand-sewing, ensure your stitches are small and tight for durability.
- Create a Flat Bottom (Optional): If you want your tote to have a flat bottom, after sewing the bottom shut, align one corner so that the side seam and bottom seam you just sewed are on top of each other, forming a triangle. Measure and mark a line perpendicular to the corner tip (about 2 inches in). Sew along this line. Repeat on the other corner. This step is optional but gives your bag a more structured base.
- Finish and Decorate (Optional): Turn the bag right side out. You can stop here, or add decorations like fabric paint, patches, or embroidery to personalize your tote.
And there you have it! Your old t-shirt has now been transformed into a trendy tote bag. This project not only gives a new life to something you might have thrown away but also offers a stylish and eco-friendly alternative to plastic shopping bags.
Revamping Old Jeans into Chic Denim Accessories
Revamping old jeans into chic denim accessories is a creative and sustainable way to breathe new life into your wardrobe. Denim is a durable material that lends itself well to a variety of accessory projects. Here’s how you can transform those worn-out jeans into fashionable items.

Materials Needed:
- Old jeans
- Scissors
- Sewing machine or needle and thread
- Pins (to hold fabric in place while sewing)
- Additional decorations (optional): fabric paint, patches, beads, buttons, fabric for lining,
Denim Bag or Purse
Steps:
- Choose Your Jeans: Look for a pair of jeans you no longer wear. The size and shape of the jeans will determine the size of your bag or purse.
- Cut the Jeans: Lay the jeans flat and decide where you want to cut. For a larger bag, you might use more of the leg. Cut across both legs to get a straight edge.
- Design Your Bag: Decide if you want a simple tote, a shoulder bag, or a purse. Think about the length of the straps and if you want to add a zipper or buttons for closure.
- Cut Out the Straps: If you’re making straps from the denim, cut two long strips from the remaining parts of the jeans’ legs. The width can be about 2-3 inches, depending on your preference.
- Sew the Straps: Fold the strips in half lengthwise, with the right sides facing each other. Sew along the edge, turn the strap right side out, and then topstitch if desired.
- Prepare the Bag’s Body: Turn the cut portion of the jeans inside out. Sew the bottom part closed. If you’re adding a lining, cut a piece of fabric to match the size of your bag, sew it into a pouch, and insert it into the denim. Sew the top edges of the denim and lining together.
- Attach the Straps: Decide where you want the straps to be placed on the bag. Pin them in place, making sure they are even and secure. Sew the straps onto the bag, reinforcing the stitches for durability.
- Customize Your Bag: This is where you can get creative. Add patches, paint designs with fabric paint, sew on beads or buttons, or add any other decorative elements you like.
- Finishing Touches: If you’ve added a lining, you might want to add pockets inside your bag. You can also add a magnetic snap or Velcro for closure to keep your belongings secure.
Your denim bag or purse is now ready to show off! This project not only gives a new purpose to old jeans but also allows you to express your personal style. Plus, it’s an eco-friendly way to add to your accessory collection. Enjoy carrying your custom, upcycled denim bag or purse!
Denim Wallet
Creating a denim wallet from old jeans is a stylish and practical way to repurpose fabric that might otherwise go to waste. Here’s how you can make your own denim wallet, perfect for holding cards and cash.
Materials Needed:
- Old jeans
- Scissors
- Sewing machine or needle and thread
- Fabric for lining (optional)
- Velcro or a button for closure
- Ruler or tape measure
Steps:
Prepare the Jeans: Choose a section of your jeans that you’d like to use for the wallet. This could be part of the leg for a plain look, or a pocket for an instantly compartmentalized wallet.
- Cut the Fabric: Using your ruler or tape measure, decide on the size of your wallet. A standard size could be around 8 inches by 4 inches when folded. Cut two pieces of denim to this size. If you’re adding a lining, cut two pieces of your lining fabric to the same size.
- Sew the Lining (Optional): If you’re using a lining, place the lining and denim pieces right sides together and sew around the edges, leaving one side open for turning. Turn the fabric right side out and press flat with an iron.
- Fold the Wallet: Fold the fabric in half to create the wallet shape. If you haven’t added a lining, you can fold the edges of the denim inward and press them flat to create clean edges.
- Sew the Sides: Sew the open sides together, either by machine or by hand, to create the pocket of the wallet. If your wallet is lined, the edges should already be neat. If not, make sure to tuck any raw edges in as you sew.
- Add Compartments (Optional): To add compartments for cards, cut additional strips of denim or lining fabric and attach them to one side of the interior by sewing along the bottom and sides, leaving the top open.
- Closure: Attach a piece of Velcro to the inside of your wallet’s opening or sew a button onto the front and cut a buttonhole on the flap to keep your wallet closed.
- Customize: Add any decorative elements you like, such as stitching patterns, fabric paint, or patches. This is your chance to personalize your wallet.
Your denim wallet is now complete! This project not only gives new life to old jeans but also provides you with a unique accessory that’s both functional and fashionable. Enjoy using your upcycled denim wallet or give it as a thoughtful handmade gift.
Denim Jewelry
Materials Needed:
- Old jeans
- Scissors
- Needle and thread or fabric glue
- Jewelry findings (e.g., earring hooks, clasps, jump rings)
- Decorative elements (optional): beads, sequins, embroidery thread
- Pliers for jewelry-making
Steps:
- Denim Earrings:
- Cut Denim Pieces: Cut small denim shapes for your earrings – circles, squares, or any design you like. You can use a template or freehand the shapes.
- Decorate: Embellish your denim pieces with beads, sequins, or embroidery to add color and interest.
- Attach to Earring Hooks: Use a needle to make a hole at the top of each denim piece. Attach a jump ring through the hole and then connect it to the earring hook with pliers.
- Denim Bracelet:
Cut a Strip: Measure and cut a long strip of denim for the bracelet. The width and length will depend on your wrist size and how wide you want the bracelet to be.
Add Fastenings: Sew a button at one end and create a buttonhole or loop at the other end. Alternatively, attach clasps with jump rings for a secure fit.
Decorate: Personalize your bracelet by sewing on beads, creating patterns with fabric paint, or adding embroidery.
- Denim Necklace:
- Create Denim Beads or Pendants: Cut out small pieces or strips of denim. Strips can be rolled into beads, while pieces can be shaped into pendants.
- Assemble the Necklace: Thread your denim beads onto a necklace cord or chain, alternating with other beads if desired. For pendants, attach a jump ring to the top and then to the necklace chain.
- Customize: Embellish your beads or pendants with additional decorations before assembling the necklace.
Customization Tips:
- Use different parts of the jeans for a variety of denim shades.
- Combine denim with other materials like leather or metal for a mixed-media effect.
- Play with distressing denim edges for a rustic look.
Denim jewelry offers a way to wear your favorite fabric in a new, fashionable form. Each piece you create is not only a statement of style but also a nod to sustainable fashion practices. Enjoy crafting your own denim accessories and adding a personal touch to your jewelry collection.
Denim Belt
Creating a denim belt from old jeans is a clever and fashionable way to reuse denim fabric. This project is relatively simple and can be customized to fit your style. Here’s how you can make a stylish denim belt to add a unique touch to your outfits.
Materials Needed:
- Old jeans
- Scissors
- Sewing machine or needle and thread
- Belt buckle or D-rings
- Ruler or measuring tape
- Fabric glue (optional, for finishing edges)
Steps:
- Select the Denim: Choose a part of the jeans that is relatively flat and without seams for the belt. The back of the legs usually works well.
- Cut the Belt Strip: Measure how long you want your belt to be, usually your waist size plus a few extra inches for overlap. Decide on the width of your belt, typically 1-2 inches. Cut a strip of denim according to these measurements.
- Finish the Edges: To prevent fraying, fold the edges of the denim strip inward about ¼ inch and sew them down all the way around. For a no-sew option, you can use fabric glue to secure the edges.
- Prepare the Belt for Buckle or D-Rings: Fold one end of the belt over the buckle or D-rings and sew it securely in place. If you’re using a buckle with a prong, make sure to cut a small hole in the belt for the prong to go through.
- Add Holes for Adjustment: Measure and mark where you want the holes for adjusting the belt. Use a hole punch or a sharp tool to make the holes. Ensure they are big enough for the buckle prong to fit through.
- Customize Your Belt: This is your opportunity to personalize the belt. You can add patches, embroidery, paint designs with fabric paint, or even distress the denim for a worn look.
- Wear Your Belt: Thread the belt through your belt loops and adjust to fit. Enjoy your new, custom denim belt!
This DIY denim belt not only gives a new purpose to old jeans but also offers you a unique accessory that’s both practical and stylish. It’s a great way to add a touch of denim to any outfit, and the customization options are endless. Enjoy creating and wearing your denim belt!
Creating Statement Jewelry from Vintage Finds
Creating statement jewelry from vintage finds is a wonderful way to give new life to old treasures. This project is perfect for those who love the charm of vintage pieces and enjoy crafting unique accessories. Here’s how to transform vintage finds into statement jewelry.

Materials Needed:
- Vintage finds (brooches, buttons, beads, pendants)
- Jewelry findings (chain, earring hooks, jump rings, clasps)
- Needle-nose pliers
- Jewelry glue (if needed)
- Wire cutters (if needed)
- Drill (for making holes in items, if needed)
Steps:
- Collect Your Vintage Finds
Start by collecting vintage items you can transform into jewelry. Thrift stores, estate sales, and your own attic are great places to look. Focus on items that catch your eye, like colorful brooches, unique buttons, or old pendants. - Plan Your Design
Decide what type of jewelry you want to create with your vintage finds. You might turn a brooch into a pendant for a necklace, old buttons into earrings, or a collection of vintage beads into a bracelet. - Prepare Your Vintage Finds
For Brooches/Pendants: Remove any old hardware from the back using wire cutters. If you’re using a brooch as a necklace pendant, you may need to attach a bail (a pendant loop) using jewelry glue.
For Buttons: If you’re making earrings or need to attach buttons to a chain, drill small holes carefully or use buttons that already have holes. - Assemble Your Jewelry
Necklaces and Bracelets: Use jump rings to attach your vintage finds to a chain. If you’re making a bracelet, you might string vintage beads onto jewelry wire or a durable thread, securing each end with a clasp.
Earrings: Attach earring hooks to your vintage finds using jump rings. Ensure the items are secure and hang correctly. - Customize and Finish
Add any final touches to your jewelry. You might combine multiple vintage finds into one piece, add modern elements to contrast with the vintage style, or use jewelry glue to secure parts that need extra reinforcement.
Tips for Success:
- Be gentle with vintage items, especially if they’re delicate or fragile.
- Experiment with combining different vintage finds for a truly unique piece.
- Consider the weight of your jewelry, especially for earrings, to ensure they’re comfortable to wear.
Creating statement jewelry from vintage finds is not only a fun and creative activity but also a way to preserve and repurpose items with history. Each piece you create will be a one-of-a-kind treasure, full of story and style. Enjoy the process of bringing new life to old pieces and wearing your personalized vintage statement jewelry!
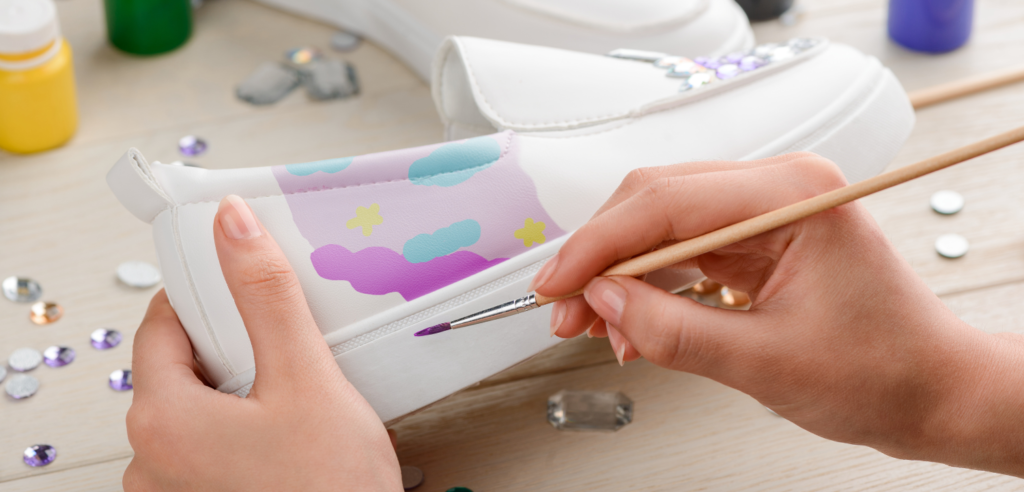
Customizing Shoes with Upcycled Materials
Customizing shoes with upcycled materials is a creative and eco-friendly way to give a new look to footwear that might otherwise be overlooked or discarded. This project allows you to express your unique style while also making a positive impact on the environment. Here’s how you can get started on customizing shoes with various upcycled materials.
Materials Needed:
- A pair of shoes (any kind that you wish to revamp)
- Upcycled materials (fabric scraps, old jewelry, buttons, beads, etc.)
- Fabric glue or strong adhesive
- Scissors
- Needle and thread (for sewing on decorations)
- Paints and brushes (optional, for adding designs)
Steps:
- Choose Your Shoes
Select a pair of shoes you want to customize. It can be an old pair that needs refreshing or a simple pair you wish to make more stylish. - Gather Upcycled Materials
Look for upcycled materials that can be used to decorate your shoes. This can include fabric scraps from old clothes, beads from broken jewelry, buttons, or even pieces of old belts. The materials you choose will depend on the design you have in mind. - Plan Your Design
Before starting, plan out your design. Decide where on the shoes you want to add your upcycled materials. Consider the style you’re aiming for, whether it’s funky, elegant, colorful, or understated. - Prepare the Shoes
Make sure your shoes are clean and dry. If you’re using paint, apply a base coat if necessary, and let it dry completely before adding decorations. - Attach Your Materials
For Fabric Scraps: Cut the fabric into the desired shape or pattern. Use fabric glue to adhere the pieces to the shoes. For a more secure attachment, you can also stitch the fabric onto the shoes.
For Beads and Jewelry: Use fabric glue to attach beads, pieces of old jewelry, or buttons to the shoes. You can create patterns or randomly place them for an eclectic look.
For Painting: If you’re adding painted designs, use a small brush for detailed work. You can paint on fabric shoes directly, but for leather shoes, ensure you use paint suitable for the material. - Let It Dry
Allow plenty of time for the glue and paint to dry completely. This might take several hours or even overnight, depending on the materials used. - Seal and Protect (Optional)
For painted designs, apply a clear sealant to protect your artwork. For added durability, especially for fabric attachments, consider a final layer of fabric glue or a spray sealant designed for shoes. - Final Touches
Once everything is dry, add any final touches. This could include tying on strips of fabric as laces, adding more beads, or even stitching on additional elements for texture.
Customizing shoes with upcycled materials not only gives you a unique pair of footwear but also contributes to sustainable fashion practices. Each pair you create will be a testament to your creativity and commitment to reusing materials. Have fun with the process and enjoy wearing your personalized, upcycled shoes!
Conclusion
Transforming and customizing items with upcycled materials not only fosters creativity but also contributes significantly to sustainability. Whether it’s giving old t-shirts a new purpose as trendy tote bags, revamping worn jeans into chic accessories, creating unique statement jewelry from vintage finds, or adding a personal touch to shoes, upcycling offers endless possibilities for expressing individual style while being mindful of the environment.
These projects demonstrate that with a little imagination and effort, materials that might otherwise be discarded can find new life in fashionable and functional forms. By choosing to upcycle, you’re not just crafting unique items; you’re also making a positive impact by reducing waste and promoting a more sustainable lifestyle.
Upcycling doesn’t require extensive skills or materials. With basic tools, some creativity, and a willingness to experiment, anyone can transform everyday items into something special. This approach to fashion and accessories encourages a deeper appreciation for the materials we often take for granted and highlights the importance of thinking differently about how we consume and reuse.
As we continue to explore and share upcycling projects, we inspire others to see the potential in items around them, fostering a community that values creativity, sustainability, and mindful consumption. Let these projects inspire you to look at your belongings in a new light and to consider how you might upcycle them into your next favorite piece. Remember, in the world of upcycling, the possibilities are as limitless as your imagination.